A Gentle Introduction Into GraphQL - Part 1: Overall Overview


In this article you will learn more about the entire GraphQL ecosystem, what GraphQL is, what it is used for and how to use it in a React based project.
It’s quite likely (as a developer… you are one, right? If not, go have a read of my how I managed to find success in programming post) that you’ve heard of GraphQL before!
If not… what freakin planet have you been living on??? For sure not on Earth!
All joking aside… it was most likely from a colleague, social media, or just one of the hot buzz words you’ve heard being thrown around in the developer world. Maybe you’ve also used it a little at work, or have seen it being used on a project, but you’ve never really bothered to get a base level of understanding for it. If one of these sounds like you, then you should keep reading.
…and don’t stop! Seriously!
To not waste your time, this article doesn’t get into the nitty, gritty technical details. So that means we will NOT cover the following (this will come in future posts):
- How to set up a GraphQL server
- Creating a GraphQL API
- Setting up GraphQL in your front end, React app
Instead… we will cover such topics as listed below and maybe, maybe a little bit more:
- What exactly is GraphQL and why was it created?
- What are the benefits and drawbacks of using GraphQL?
- The main concepts
- How do you use GraphQL in a project (on the front end)?
- Is it possible to manage state with it?
- What is a schema?
- How do you create CRUD (create, read, update and delete) operations?
Now that is out of the way… let’s start with a basic history, background and some introductory concepts before getting into a little bit more technical topics. Also, feel free to skip any sections that do not interest you (though I do not recommend it).
BACKGROUND, HISTORY and MAIN FEATURES
Who created GraphQL?
GraphQL was created internally by Facebook and later introduced, plus open sourced, to the public in 2015. One of the reasons that Facebook had created GraphQL was to solve some of their internal data management problems, as they were not happy with the existing tools available to them.
What is GraphQL?
GraphQL is a different and modern approach to retrieving and updating data. It is highly flexible and more efficient than the traditional REST (RESTful API) approach.
It essentially serves as a communication channel (by sending data) between the client (front end application) and the database.
However, note that it is not a database language and it is also not something that can only be used in React based projects. It in itself is a query language for APIs (APIs are a way that different software code can communicate with each other).
It can be used as a server, database and for state/cache management along with some other tools.
So basically… it is freakin awesome and rad!
What are some of its benefits?
- Efficient loading of data
GraphQL allows you to query for exactly the information that you need from the API. This means that you will not have to send data over the server that you aren’t going to be using in your application. This is something that is super important in today’s mobile heavy-usage world, as every byte of data sent over the network counts.
Another benefit of this is that it solves the problem of over fetching, or under fetching, data, which can occur when using RESTful APIs.
- Single Endpoint
If you are familiar with RESTful APIs, you will know that one needs to create an endpoint for every specific interaction in your application. However, with GraphQL there is only one endpoint that needs to be created. The data, or information, that gets sent through this endpoint is what is variable. This greatly simplifies things and reduces complexity.
- Flexibility
The great thing about GraphQL is that you are not restricted by the amount of endpoints that exist. If you need to expand, or build a new feature, obtain extra data, you do not have to create a new endpoint that connects to your application. This allows for easy expansion and modifications to GraphQL queries, since they are written in an object-like manner. This also results in faster development.
- Broad Use
GraphQL can be used by any frontend framework/platform and each may have different data usage requirements. The flexibility of GraphQL allows each service to only obtain the data that they require (without getting bloated information) and this makes it a highly powerful API.
By this point you are probably thinking…
OMG!!! How can I use this in my project?
Patience… my friend. We will get there. But we need to cover some of the not-so-nice topics first :(
What are some of its drawbacks?
- Verbose
Using GraphQL, along with a state/cache management tool, can take a little bit of time getting used to the entire syntax/structure of the GraphQL “architecture” of doing things. Parts are a bit repetitive, or confusing, and one simply needs to get used to it.
- Learning Curve
Related to the above, it can take a bit of time to fully understand how to use GraphQL and understand the whole syntax, workflow and concepts. This can especially be a hinderance for large teams if they are considering switching to GraphQL because of two things. The overhead of the team having to not only learn a new technology, but also the amount of time required to convert a project over to use GraphQL.
- Relatively “new” technology
You might be thinking…
What isn’t “new” technology in tech? By the time I fully learn a new technology, it’s almost outdated anyways.
Annnd you wouldn’t be completely wrong there!
In terms of professional development years, GraphQL doesn’t have that maturity quite yet. But it has been around for several years and was created by a large organization (Facebook). It might not have every kink sorted out like other state management technologies (re: think Redux), but many companies have switched to it as they see the benefits/power of it (like the company I work for).
- Support
The community is not as large as the one behind Redux and you are more likely to encounter issues or problems that haven’t been ideally solved before.
- Server side caching
Server side caching is difficult to implement using GraphQL and there aren’t any good solutions to tackle this issue. The main reason for this is because we cannot know in advance what the client query will be. This is due to the flexible nature of GraphQL which allows you to query for exactly what you want and queries can easily be expanded/reduced.
Woah! If you are thinking that GraphQL is just absolute trash now… then I suggest you close this tab and never come back!
On a more serious level… you should note that some of these “drawbacks”, aren’t necessarily that big or even bad. However, whether using GraphQL makes sense, or not, will depend on if it is for a personal project, a new team project, or if it’s going to be used on a large, existing team that would require a lot of refactoring. These are just some of the things that you’d need to consider before deciding if it is the “best” fit for your specific situation.
Now that this is out of the way… let’s move on to some more interesting topics.
INFRASTRUCTURE
In order to get GraphQL working properly in a project, there are several layers, or parts, that need to be set up. This section will quickly explain what is needed (at a high level) for your understanding and then we can delve deeper into the core concepts. Below is an illustration of the main parts and each aspect will be explained in further detail.
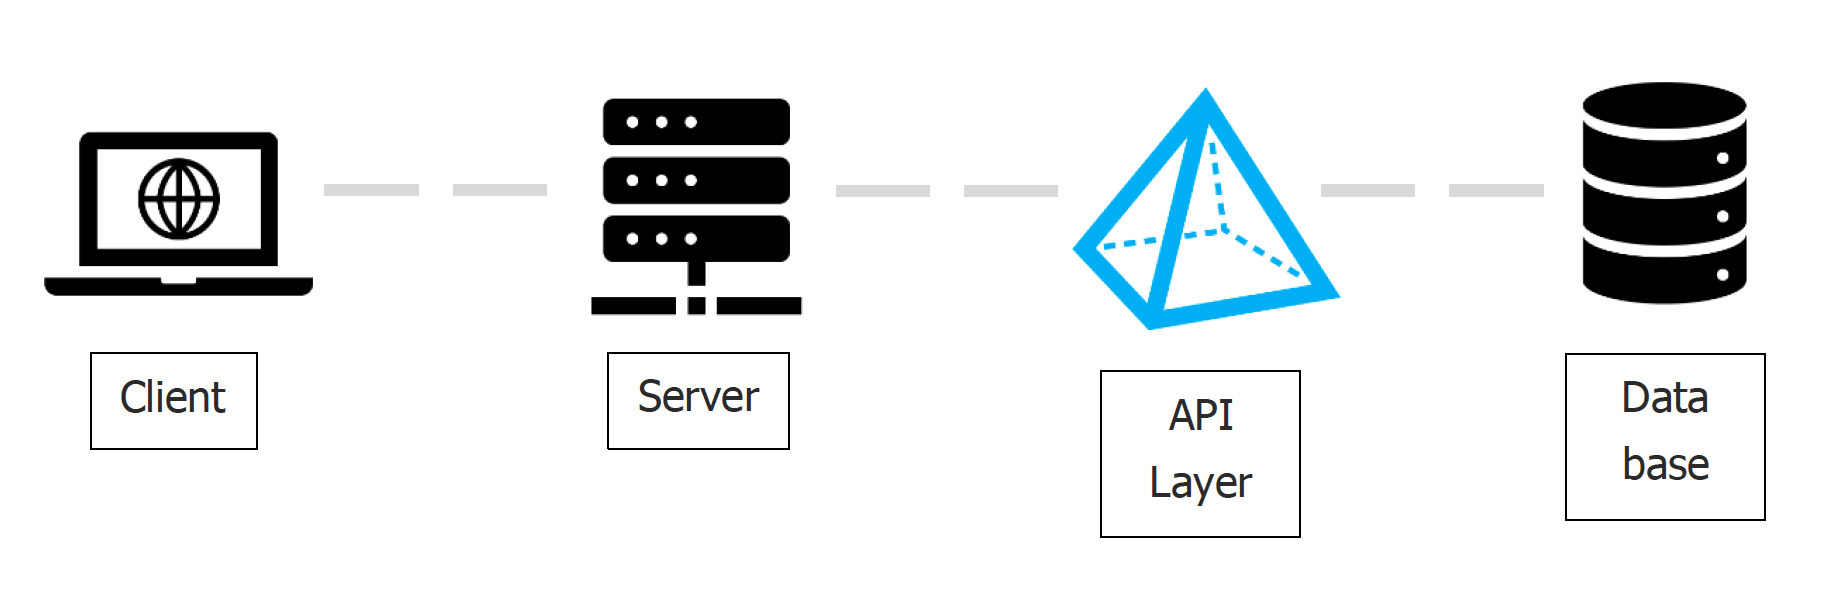
Database (backend)
This is where your data will be stored, so information can persist beyond a session on your client. Do note that only some databases are supported here to work within the GraphQL ecosystem (Ex: PostgreSQL, SQLite, …etc).
API Layer (backend)
To set up the GraphQL API layer, there are many different options to choose from, and each has their own approaches, but generally they’re trying to accomplish the same thing. Rather than overviewing all of them, only one of the main ones will be explained briefly.
Currently, one of the good solutions is to use Prisma. Prisma acts as a layer between your backend server and your database. It essentially turns your database into a GraphQL API and lets you access your database inside of GraphQL resolvers. This makes Prisma very powerful since you can access your data easily with an auto-generated and type-safe builder that is in sync with your database schema. Prisma is an alternative solution to, and meant to replace, traditional ORMs (Object-relational mapping).
Server (backend)
There are many options to choose from when setting up a GraphQL Server, but only one (graphql-yoga) will be covered. Prisma is also the creator behind graphql-yoga and have designed it to work with all GraphQL clients, which is one of many reasons why it is awesome. In addition, it is fully-featured, quick and easy to setup your server and very powerful.
Within graphql-yoga is also a very powerful GraphQL Playground that lets you test and interact with your API. This playground will be covered in more detail later on.
Client (frontend)
Finally… we get to the frontend!
There are a few options that you can use for your client here.
Urql – This is the newest one and one should note that it is highly focused on React applications.
Relay – Which is Facebook’s own solution and is heavily optimized for performance.
Apollo Client – This is a community driven solution that aims to be flexible, easy to understand and powerful. They currently have support for all the major JavaScript frameworks (Angular, React, Ember, Vue …etc). Apollo client is used to communicate with your server and also has the ability to manage state with Apollo Cache, which happens to be the recommended way to do so rather than using another state management solution.
This article will focus on Apollo Client.
Now that you have a basic understanding of how everything works together in the GraphQL world, let me explain some of the fundamentals before we look at how to use GraphQL on the frontend.
Well only a little…
MAIN CONCEPTS
In order to better understand GraphQL, this section will briefly cover some of the back end concepts/topics in setting up your server and the main front end topics. This is so you can have a better understanding of how the entire GraphQL structure is pieced together.
GraphQL Schema (backend)
In order to get GraphQL to work properly as an API on the backend, a GraphQL server needs to be built/created. The most critical, or important, things to know are the Schema and Type definitions. The Type definitions are created to define the GraphQL schema. This schema is defined by the Schema Definition Language (SDL). This is used to configure how your client on the frontend will be able to interact with the API.
If you are thinking…
What the heck is a schema??
Don’t worry! This will become clearer over the next few sub-sections. But a schema is basically a way for us to define how all the information is pieced together.
Types
Types are used in GraphQL to define a schema. They tell us what the field, or property, will contain. The following are the scalar types that can be used when creating schemas.
Boolean —> The value will be either true or false
Float —> A signed double-precision floating-point value
ID —> A unique identifier that’s often used to re-fetch an object or as the key for a cache. Although it’s serialized as a String, an ID is not intended to be human‐readable.
Int —> A signed 32‐bit integer
String —> A UTF‐8 character sequence
In addition to these scalar types, we also have two other ways to describe data when defining the schema. They are the following:
[] —> Empty brackets. This indicates that the value coming back is an array of a specific scalar type (when a value is placed between the brackets). It can also be a user defined object type (this will be explained in the next section).
! —> Exclamation mark. This indicates that the following field is required (in other words… mandatory).
Schema
We are able to define schema types with variable names. These variable names need to be capitalized and the naming is completely dependent upon the project.
In GraphQL, we usually use the basis of (object) types to create a GraphQL schema. This means that you specify the properties (fields) of the object and this will be a representation of the data that you want to retrieve. Following the basics of the Types definition (see previous section), an example schema for a user could look like the following.
type User {
  avatar: String
  name: String!
  joinDate: String!
  id: ID!
  friends: [Friends]!
}
Let’s go over what this schema means. You will first notice that the “avatar” field does not have an exclamation mark (!), which means that it is an optional field. It also tells us that it is of the string type definition. The remaining fields all have exclamation marks, and if you query for any of those fields, you will always get back a value. In the case of the “friends” field, you will always at least get back an empty array, as the user may have no friends (an empty object).
Let’s move on to how this will look like on the front end.
Queries (frontend)
What does a GraphQL query look like? A sample GraphQL request would look like the below (from your GraphQL client) and it’s “easy” to decipher the information that you are requesting.
query GetAllUsers {
  users {
    avatar
    name
    joinDate
    id
    friends {
      id
      name
      messages {
        id
        timestamp
        message
      }
    }
  }
}
Here you can tell that you are querying for all users in the database and requesting each user’s name, avatar, join date, id and their friends. Then off of their friends, you are creating an object that lists each friend’s name, id and their messages. Lastly, within messages, you are requesting all the messages stored between the user and the friend. For each message there is an id, time stamp and the actual message contents.
Now let’s say that you add a new feature to your application that allows each user to save their favourite colour. Assuming that this information has been expanded in your database, you’d simply need to add the variable name that correlates to the user’s favourite colour into your query. So an abbreviated version of the above request would now look like the following.
{
  avatar
  favouriteColour # new parameter that you want to query for on the front end
  name
  ...
}
As you can see it is super simple to add (or alternatively to delete) the information that you want to obtain from queries.
Now you might be wondering…
What would the response from the API look like??
Assuming that there is some information populated in the database for the query, it would come back with a data object containing the requested information in the same shape that you specified. This is more clearly explained with an example and continuing from the previous query.
{
  data: {
    users: [
      {
        avatar: "https://www.mystorage.com/mycoolavatar",
        name: "George",
        joinDate: "2020-01-22",
        id: "H32DWF5435IRHJE21",
        friends: [
          {
            id: "X54TYE2314GHJRE12",
            name: "Sally",
            messages: [
              {
                id: "fhsdjkfh000000001",
                timestamp: "2020-09-17",
                message: "Hey!",
              },
              {
                id: "fhsdjkfh000000002",
                timestamp: "2020-09-17",
                message: "Where are you?",
              },
            ]
          },
        ]
      },
    ]
  }
}
The most important thing to keep in mind with queries is that they are read-only!
Mutations (frontend)
Similar to queries, mutations are used to write data into your database (create, delete, or update). The syntax and structure is roughly the same, but they start off with the word mutation. An example of this is shown below:
mutation CreateNewUser {
  addUser(avatar: "bit.yl/1234", name: "John Doe", joinDate: "2020-Dec-25", friends: []) {
  }
}
This mutation will not return anything back from the server, but if you were to place a field (variable) within the inner curly brackets, you would get those field values back in an object for the new user you are creating.
Playground (backend server) that lets you test your API.
The GraphQL playground is an experimental way to test your API. It provides a nice visual way to create queries (or mutations), see the response from the server and learn overall how things work. An example of one playground looks like the following:

On the left side of the screen you can write your queries (or mutations). In the bottom, you can set specific headers or query variables when making test calls. On the right side is the response back (including real data) that you get from your server.
In addition you can see “docs” and “schema” on the far right of the screen. These are auto-generated files when you create your type/schema definition in the backend and can be a handy way to see how each type object relates to one another and what field data it contains.
How to use GraphQL within React (hooks)
Please note that there is some base setup required in your root component. This is required in order to get the ApolloProvider and client to work correctly (as in fetch data from your API). However, that setup will be covered in the second part to this article. For now… we will just focus on using it within a component.
Queries
The following methods are ways you could set up queries within React.
-
Using a HOC method of compose (however, since V3 of Apollo it is no longer possible. You could still implement this method using flowRight from Lodash, which does the same thing).
-
Use Apollos Query structure within your component.
-
Use the useQuery hook within your component.
This article will only cover the third option and I’ll show you an example of how to do this.
Continuing along with our user example from the previous section, let’s build up a very basic component that would show the profile of a user. You can see the code of that below.
import React from "react";

function UserProfile() {
  return (
    <div>
      <h1>Welcome</h1>
      <img
        alt="avatar"
        src="https://www.profilepic.com/me"
      />
      <span>Join date:</span>
    </div>
  );
}

export default UserProfile;
Let’s expand this example to include the GraphQL requests for the data, and how we might populate our component with it.
import React from "react";
import { gql, useQuery } from "@apollo/client"; // import our GraphQL from Apollo

/** Create our GraphQL query and store that in a GET_USER variable */
const GET_USER = gql`
  query GetUser {
    avatar
    name
    joinDate
    friends {
      id
      name
    }
  }
`;

function UserProfile() {
  // Here we destructure off the data object & loading from the useQuery hook. Then we
  // destructure the variables we need off the data object.
  const { data, loading } = useQuery(GET_USER);
  const { name, avatar, joinDate, friends } = data;

  // If we haven't gotten a response back from our GraphQL request, return some loading text.
  if (loading) return <div>...Loading!</div>;

  // Here we create our HTML markup (with our dynamic content) that we receive in the data
  // object from our GraphQL request.
  return (
    <div>
      <h1>Welcome {name}!</h1>
      <img alt="avatar" src={avatar} />
      <div>Join date: {joinDate}</div>
      {friends ? (
        <ul>
          {friends.map((friend) => (
            <li key={friend.id}>{friend.name}</li>
          ))}
        </ul>
      ) : null}
    </div>
  );
}

export default UserProfile;
Let’s go through the built up component, line-by-line. At the top of the component we are importing gql, which will be used to create the type object of the data that we want to retrieve, and the useQuery hook.
Next we define the fields that we want from the GetUser query and store this information into a GET_USER variable.
Within the UserProfile component, we call the “useQuery” hook and destructure off the data (what we receive from the API) and loading (a boolean value that evaluates to true while we are waiting for the response).
Next we have a condition that if loading is true, loading text is displayed on the screen to the user.
Since the response we get back from GraphQL is stored in the data variable, we then need to destructure the information that we want based off what we had queried for in GET_USER. Finally we use these destructured properties inside of our return statement based on what information we want to show to the end user.
Mutations
Mutations are done in a similar manner to queries, and will be covered in part II of this GraphQL article series. If you really want to learn more about mutations, you can always refer to the Apollo (React) documentation on mutations.
CONCLUSION
As you saw from this article, there are many parts involved (both frontend and backend) in order to be able to set up and then use GraphQL within your React based project. Hopefully you now have a good introduction to the overall picture, when to use GraphQL and the basics of using it in a project.
Now go code something awesome!